My father, who used to be the plant supervisor for a company that manufactured holiday tree stands, was accustomed to dealing with procrastination. “I’ll get around to it,” someone would tell him. His response was to reach into his desk drawer and hand that person a red wooden checker, embossed with the phrase, ROUND TO IT. “There you go,” he’d say. “Now you have one, and now you can get the job done.”

Obviously, I needed a ROUND TO IT back in September 2009, when I asked readers to modify a tin, following the rules of the Convert-a-Tin Challenge, and share their results. I’m afraid I procrastinated . . . and so did everyone else.
Let’s try this again, and make it easy. Modify any kind of tin container you prefer (cookie, candy, coffee, whatever). You can embellish the tin, connect it to something else, make it larger (or smaller), use part of it, substitute it for something else . . . in other words, do whatever you want. Just make sure your end product is different than your beginning product. Then, photograph your results, and come back to this post. Add your link to your photo to the comments in this post by April 30, 2011.
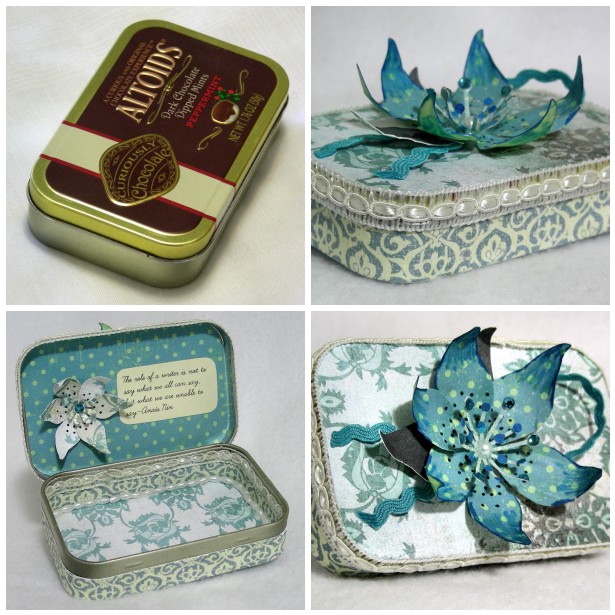
Meanwhile, here is my embellished box, an Altoids® candy tin that has been converted to a little treasure box for flash drive storage or postage stamps. The quote on the inside, by Anaïs Nin, suggests that this converted tin is a gift for a writer. “The role of a writer,” she clarifies, “is not to say what we all can say, but what we are unable to say.”

Here are the steps I followed to embellish the box.
1. Identify the tin container you will modify.
2. Gather decorating supplies: papers, trims, and ephemera.
3. Rough up the bottom and top of the tin with sandpaper to make it easier for adhesive to stick.
4. Trace the bottom half of the tin 3 times onto card stock, and cut out the pieces. One piece fits inside the lid, the other fits the outside box bottom, and the third fits the inside bottom (although you will have to trim it slightly). Use tape runner adhesive to stick the paper to the inside of the box, and Golden® Gel Medium (you could also use Mod Podge®) to adhere paper to the outside of the box. On the outside, sand off any paper extending beyond the box edges.
5. Measure the interior height of the box bottom, and cut a strip of card stock (you could also use fashion trim) to fit inside the box. Use tape runner adhesive to stick the paper to the inside edge of the tin.
6. Measure the exterior height of the box bottom, as well as the height of the lid, and cut 2 lengths of card stock and/or fashion trim to fit the outside edges. Use your choice of adhesive to stick these items to the edges. Depending on what I’m working with, I like to use a tape runner adhesive, Golden® Gel Medium, or Scotch® Quick-Dry Tacky Adhesive.
7. Trace the box lid onto card stock, and cut it out. Adhere the card stock onto the lid with Golden® Gel Medium (you can also use Mod Podge®). On the outside, sand off any paper that extends beyond the lid.
8. Finally, embellish the inside and outside of the box.
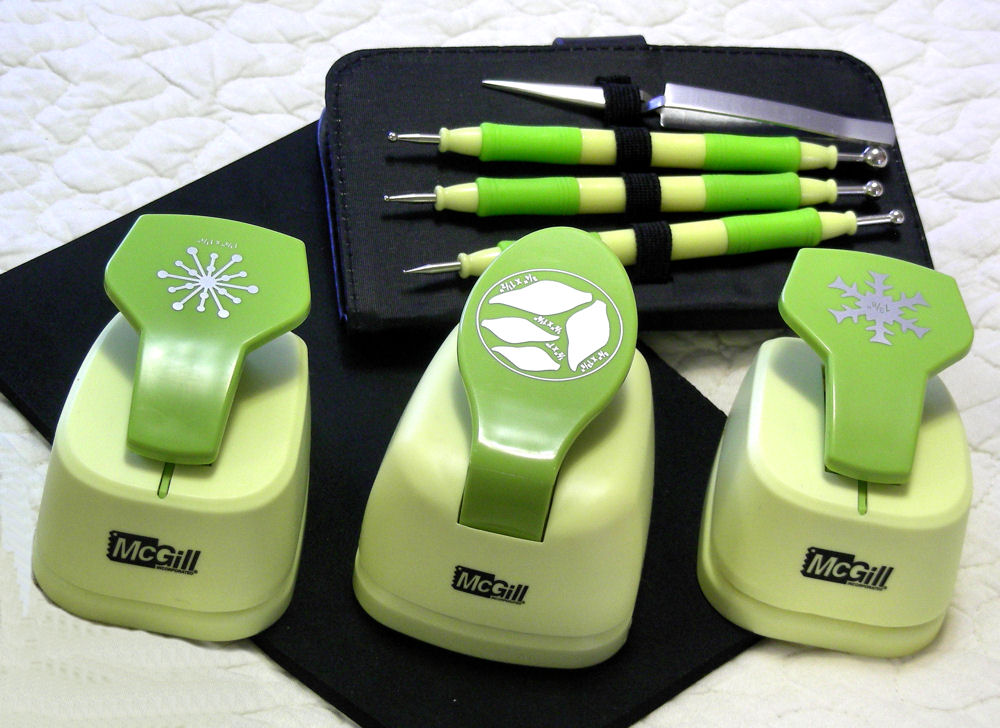
How did I make the 3-D flower on the lid? I crafted the blossom using McGill® Paper Blossoms punches, craft molding mat, tweezers and stylus. Then I shaped, pinched, bent, cupped and assembled the pieces. You can visit McGill®’s site here to learn about all of their tools, or click on the photo below.

The McGill® Paper Blossoms video below provides step-by-step instructions.
Are you participating in the Convert-a-Tin Challenge? Add a link to your photo in the comments below.
© 2011 Judy Nolan. All rights reserved.

Your Dad is fun with that button–what a great idea!
And the tin is gorgeous! That is something that I would want in my room; love the colors and all of the touches.
Beautiful Judy. I have a stack of altoid tins and have done some altering in the past, but none as beautiful as the one you made. Thanks for the video too. Very interesting.
Thanks, Kym. Your tutorial on altering Altoid tins, and Ani of CoffeePotPeople’s altered tins, are what originally got me started on this project. I’m referring to this tutorial: “Alter a Tin Container Into a Cute Coin Purse”
I love the way this came out, especially the colors and the flower! Very nice.
I cannot believe the beautiful transformation of this tin. Thank you for the instructions, I want to do it!
Sounds like a fun contest, hope you have many entry’s.
Maybe you can tell me how you do that 4 square photo collage ^^^up^^^ there??? My etsy shop convo or in the forum? Pretty please with sugar and a cherry on top …
Re, I use Mosaic Maker to make photo collages, which is a free site: http://bighugelabs.com/mosaic.php
I save lots of tins . . . but . . . have never got “a round to it!” Guess I better join the challenge–NOW!
How long will you have this challenge up, Judy?
Right now it’s set up to give everyone lots of time–till April 30th.
I love your tin! I’m afraid I don’t have the time to try to do one of my own right now 🙁
So cool…love the flower on top!
I’ve made some of these into mini scrapbooks before 🙂
great challenge (though I’m SO busy!) And I love that paper punches. Always wanted to get a few. {:-D
Cool idea!
That flower is so pretty.
I am your newest follower and I found you through the blog team.
http://mishmashandmore.blogspot.com/
(First of all, that button idea is fantastic!)
I’m tempted to try this, I have at least a dozen altoid tins lying around my workspace waiting for inspiration, along with a few cookie tins saved from December. I’m going to think about this one and see what I come up with, this may be fun!
Super cute idea! I love how your’s turned out! 🙂
Guess I blew it on this one! And I kept having this page pop up to remind me. Going to see what else was entered to inspire me to more creative recycling in the future.